
List of Renault Zoe Suspension Issues (7+ Pro Tips)
 By
Vroomouk
By
Vroomouk
In this brief article we are going to discuss the different Renault Zoe Suspension problems, what the causes are, and Troubleshooting Tips.
Top 5 most common suspension issues in the Renault Zoe
The most common suspension issues seen in the Renault Zoe are:
- Front Suspension Creaking and Popping Noise while steering
- Front Suspension Knocking and Squeaking
- Rear Suspension Knocking and Squeaking
- Front Lower Control Arm Failure
- Front Suspension ‘Clunking’ Noise
What suspension does the Renault Zoe have?
The Renault Zoe was first revealed as a concept in 2005. It was only until in 2012 that the production-ready version was revealed in the Paris Motor Show.
Front Suspension

The Front suspension in the Renault Zoe is a MacPherson Strut and Lower control Arm with Anti-roll bar. This arrangement is mounted onto the Monocoque Chassis.
Rear Suspension

The Renault Zoe has a Torsion Beam Trailing Arm Suspension configuration with Coil Springs and Shock Absorbers.
Front Strut Top mount failure
Symptoms:
- ‘Popping’ and ‘Creaking’ noise while steering at parking
- ‘Knocking’ noises while going over bumps
Troubleshooting Front Strut Top Mount Failure
- In cars that have a front MacPherson Strut set-up, a ‘Creaking’ noise while steering during parking is typical of a strut top mount failure
- The Strut Top Mount contains a Bushing as well as a bearing that allows the strut to rotate while steering
- Generally, when the Strut Top mount is damaged, both the bushing as well as the bearing fail, which restricts the strut while trying to rotate the steering wheel
- The bearing failure causes the knock and creak noises while locking the steering
- The Bushing failure causes the Knocking and Popping noises driving over a rough patch
- The Strut Top Mount is assembled with the Front Shock Absorber Strut. So for removing this, you would need to disassemble the Front Strut.
PRO-TIPS:
- In the interest of safety, Always use a safe method to compress and Decompress the Spring while dismantling the front strut assembly.
- It is preferred to use a Hydraulic or Pneumatic Strut removal fixture
- If that isn’t available, then use a Lead-Screw Type of Spring Compressor
Front Strut failure
Symptoms:
- You notice that while going over bumps or speed-breakers, the suspension tends to be bouncier than usual and does not settle instantly
- On a rough road it feels ‘Floaty’, as if the front end is losing grip when you increase speed
- Knocking and squeaking noises from the front
Troubleshooting Front Strut Failure
- Front suspension Bounciness generally means that the Strut Damper (Shock Absorber) is not doing its job.
- Knocking and Squeaking all point to a failed Strut Damper
- If your vehicle has crossed 50K-80K miles, then it could be due for a shock replacement, depending on the usage pattern. Due to long-term internal wear, the shock starts becoming ineffective over time.
- If the front strut shock has started leaking oil, then it means that the shock will no longer be effective.
- One good way to tell if your shock has failed or not is to do a Bounce Test. Put all your weight on one of the front corners of the vehicle pushing it downwards. Keep oscillating the corner till you feel that it has reached its maximum height. Once you take your hands off the corner, observe how it settles. If it takes more than 2 oscillations to settle, that means the damper has failed.
Rear Shock Absorber Failure
Symptoms:
- Knocking and Squeaking Noises from the Rear going over bumps
- Rear end feels bouncier
- Poor Handling; especially during lane change at highway speeds, the rear end feels loose
Troubleshooting Rear Shock Absorber Failure
- The Bouncy Ride symptom points to the Shock Absorber as a probable cause.
- The noises coming from the rear are partly due to the failed shock absorber allowing the bump stops to contact more often. And also the noises partly come from the worn out shock mounting bushes that allow the shock to move and hit against the mounting brackets.
- If your vehicle has crossed 50K miles, then it could be due for a shock replacement. Due to long-term internal wear, the shock starts becoming ineffective over time.
- If the rear shock has started leaking oil due to a failed oil-seal, then it means that the shock will no longer be effective.
- As with the Front Shock Absorber, the easiest way to tell if your Rear Shock Absorber has failed or not, before dismantling it, is to do a “Bounce Test”.
- Once the Strut Shock absorber has been dismantled, there is one more way to see the shock condition for yourself by way of a ‘Compression’ test.
- You can simply apply force on the top of the shock and compress it. If it can come back up on its own, then the shock is in fairly good condition. But if it takes too long or doesn’t expand on its own, it’s confirmed that the shock absorber has failed.
PRO-TIPS for Front/Rear Shock Absorbers:
- It would be wise to consider changing your shock-absorbers every 50k to 70k miles, since that is the average life for most MacPherson Strut suspensions.
- Before fitting any new front/rear shock absorbers, it is always recommended to ‘Start’ the shock absorber by keeping it vertical and then pumping it 3-4 times fully by hand.
- The shocks are mostly stored in a ‘lying-down’ position (ideally they should have been stored in a vertical position). ‘Starting’ is done as a precaution to ensure that the fluids properly move fully across the piston valves after.
- While fitting a new Rear shock absorber, always, tighten the Top mounting bolts first and then the Lower mounting bolt.
- Also make sure that while tightening the Rear Shock Absorber bottom bolt, the Wheel Hub is supported at its normal ride height. For this you can either use Blocks, a screwjack or a jack stand.
- If the shock bottom mounting bush is tightened at any other ride height, then when the car is lowered to normal ride height, the Bush will rest in a twisted condition and will have a reduced Bush service life.
Front Lower Control Arm Failure
Symptoms:
- The car seems to be drifting
- Steering seems vague while Lane Changing
- Uneven Tire Wear pattern
- Knocking Noises while going over Rough Patches
Probable Root Causes:
- Due to a Tire wear issue, it can be inferred that the alignment of the front suspension is outside of the recommended settings. But this is still a symptom.
- The cause for the change in alignment is closely related to the Lower control arm Bushings and Ball-joints that may have got worn or damaged
- With worn out bushings and ball-joints, when the tires experience lateral contact forces from the road, the play caused by worn out bushes/ball-joints allows the suspension to move out of its alignment and cause premature tire wear.

Troubleshooting Front Lower Control Arm Bushing Failure: Lower Control Arm Bushing
- Lower Control Arm bushing wears out over time and cracks due to age
- To assess the bushing condition, you can use a Pry-bar and insert it between the Lower control arm and the Subframe. Now, try to move the Lower Control arm using the Pry-bar and observe the movement at the Bush location. If the lower control arm moves without much force, then it means that the bushes have worn out.
- When inspecting the Lower control arm after removal, it is clear that there are tears and cracks in the rubber portion.
Troubleshooting Front Lower Control Arm Bushing Failure: Lower Control Arm Ball-Joint
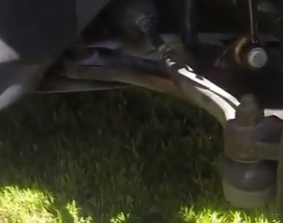
- The lower control arm ball-joints are also subject to wear and tear.
- The deterioration is usually initiated as a crack or rupture in the rubber boot around the ball-joint
- This leads to loss of lubrication and finally to complete wear out
- The wear out causes play or movement accompanied by knocking noise. The play in the ball-joint is one of the reasons for the vehicle steering feeling value
- You can easily check for Ball-joint condition by this simple procedure:
- Get the car on a Ramp
- Lock the steering wheel
- Hold the front tire with both your hands and try to steer the wheel
- If you hear a ‘Knock’ or ‘Click’, then it is very much likely that the noise is due to a play in the Ball-joint
- The best course of action would be to replace the whole Lower control arm since it comes with 2 new bushings and 1 new ball-joint all pre-assembled
PRO-TIPS:
- For Rusted Bolt connections that are hard to Break-open, do not try repeatedly using hand or pneumatic tools.
- Always first soak it for 10-15 min after spraying a good Rust-penetrant
Front Suspension “Clunk” Noise
Symptoms:
- While going over bumps, there is a distinct “Clunk” noise
- This sort of noise is generally not there when driving on a smooth road

Troubleshooting Front suspension “Clunk”: Anti-roll bar chassis mount bushings
- The most probable source of ‘Clunk’ noise would be the Anti Roll Bar Chassis bushing. When this bushing has worn out, it results in the ARB making the noise.
- Check the Anti-Roll Bar Chassis bushings. If there is a gap between the bushing and the Stabilizer bar, then this could be a source of noise
PRO-TIPS:
- Try to find an aftermarket Bushing that has more hardness than the original Bushing. You can check this by comparing the Shore “A” hardness value of the 2 bushings. A Harder bushing will last longer
- Always use a good quality “Rubber Grease” while replacing the bushing on all the contact surfaces of the bush (inner as well as outer)
- Using Grease will help to extend the life of the Bushing by preventing excessive wear
Troubleshooting Front suspension “Clunk”: Anti-roll bar Drop-Links

- Rear Knocking sounds that increase on a rough road are the signs that point to an issue with the Anti-roll bar(ARB) links
- The anti roll bar does not articulate so much on smoother surfaces and hence is less noisy
- Check the Stabilizer Bar Drop-links.
- Inspect the Ball-joint at each end of the ARB drop-link.
- If there is excessive play in the ball-joint, you will be able to hear a ‘Clunk’ when you try to move the Drop Link by hand
- The ball-joint generally fails when there is no lubrication within the joint
- The ball-joint’s lubrication is protected from leaking out by means of a Rubber-boot
- When the rubber of the boot weathers over time, it develops cracks and tears.
- Through these tears, the lubricant/grease escapes, this leads to rapid wear out of the ball-joint
- Once the ball-joint is worn out, there is clearance between the ball and socket. When the suspension articulates, the Ball-joint moves and creates noises.
PRO-TIPS:
- For Nuts/Bolts that have rusted, always soak using Anti-Seize, so that you will avoid stripping the threads during the removal process. (If the threads do strip, then you would be left with no choice other than to cut the bolt. You generally want to avoid such a situation)
Conclusion
In this brief article we have discussed the different Renault Zoe Suspension problems, what the causes are, and Troubleshooting Tips.
For any questions or comments, please feel free to get in touch with us.